Fortunately, it’s quite easy to prevent your Windows 11 PC from connecting to a Wi-Fi network automatically. Here we show three different ways to do the same. So, let’s check them out.
1. Stop Automatic Connection to a Wi-Fi Network Using the Settings App
Windows 11 lets you configure majority of the network details using the Settings app. Follow the steps below to prevent Windows 11 from connecting to a Wi-Fi network automatically. Step 1: Click on the Start icon and click the gear-shaped icon to launch the Settings app. Alternatively, you can use the Windows key + I keyboard shortcut to launch the Settings app instantly.
Step 2: Use the left sidebar to switch to the Network & internet tab and click on Wi-Fi.
Step 3: Click on Manage known networks to view all the saved networks.
Step 4: Select the network you don’t want your computer to join automatically.
Step 5: Uncheck the box that reads ‘Connect automatically when in range.’
The Settings app will remember your preference. The next time you want to use that network, you’ll need manually select it.
2. Stop Automatic Connection to a Wi-Fi Network via Control Panel
Although Microsoft is gradually replacing the old Control Panel in favor of the Settings app, you can still use it to make changes in Windows 11. So, if you prefer to do things the old-fashioned way, here’s how you can use Control Panel to prevent Windows 11 from connecting to a Wi-Fi network automatically. Step 1: Press the Windows key + R to open the Run dialog box. Type control in the Open field and press Enter.
Step 2: Use the drop-down menu in the top right corner to select Small or Large icons. Then, click on Network and Sharing Center.
Step 3: Click the Change adapter settings option on the left pane. This will open the Network Connections window.
Step 4: Right-click the Wi-Fi adapter and select Status from the context menu.
Step 5: In the Wi-Fi Status window that opens, click on Wireless Properties.
Step 6: Under the Connection tab, untick the ‘Connect automatically when this network is in range’ checkbox. Then, click on OK to save changes.
3. Stop Automatic Connection to a Wi-Fi Network With Command Prompt
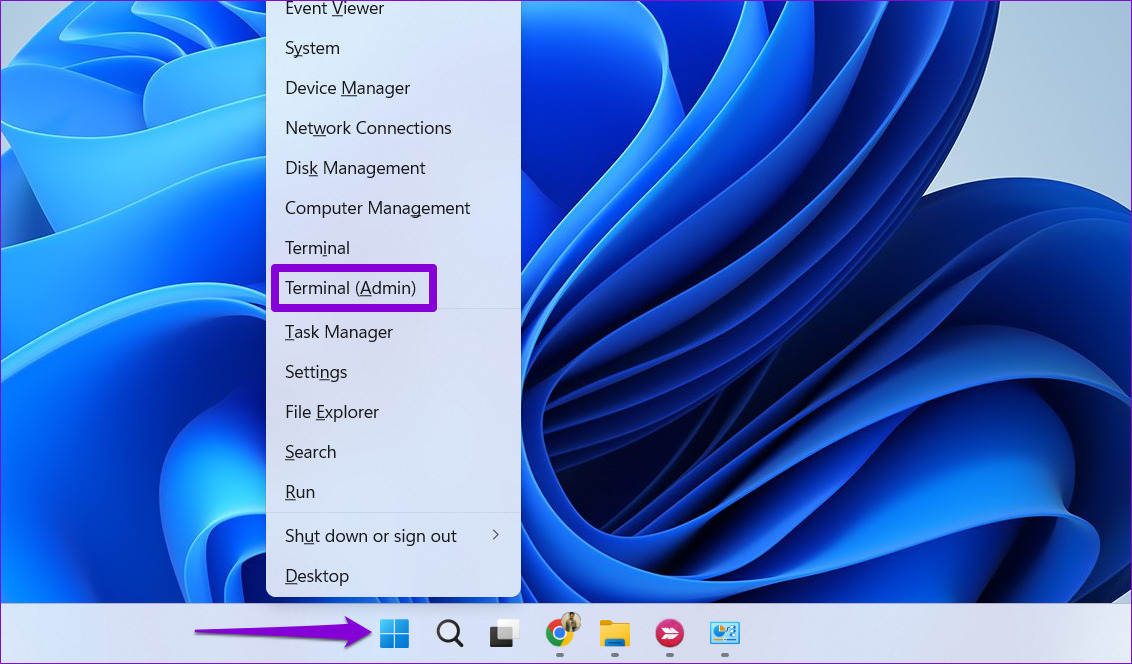
The Command Prompt is the go-to destination for power users to make system-level changes. You can use the Command Prompt to run a couple of commands to prevent Windows 11 from connecting to a Wi-Fi network automatically. Here’s how you can go about it. Step 1: Right-click on the Start icon or press the Windows key + X to open the Power User menu. Select Terminal (Admin) from the list.
Step 2: Select Yes when the User Account Control (UAC) prompt appears.
Step 3: Copy and paste the following command and press Enter to view a list of saved wireless networks on your PC:
Step 4: Note down the name of the network for which you want to disable the automatic connection. Step 5: Run the following command and press Enter to prevent Windows 11 from connecting to the network automatically. Replace Network Name in the above command with the name of the wireless network noted in the last step.
The above commands will also work with Windows PowerShell. Once you run them, Windows 11 will no longer connect to the specified Wi-Fi network when it is in range. You can repeat the above command to prevent Windows 11 from connecting to other networks.
Command and Control
Connecting to an unsecured Wi-Fi network can put your system and personal data at risk. Aside from the methods listed above, you can also prevent Windows from connecting to a network during the initial network configuration process. If you’ve already connected to a network, you can use any of the methods listed above to prevent Windows from connecting to the network automatically. While we only talked about Windows 11 in this post, these methods will work on Windows 10 too. The above article may contain affiliate links which help support Guiding Tech. However, it does not affect our editorial integrity. The content remains unbiased and authentic.